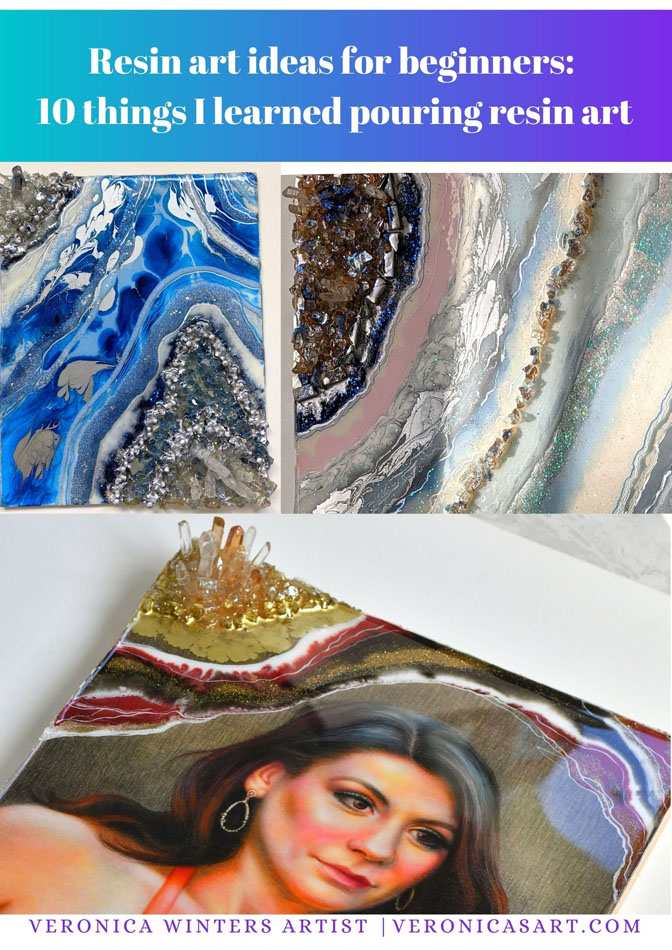
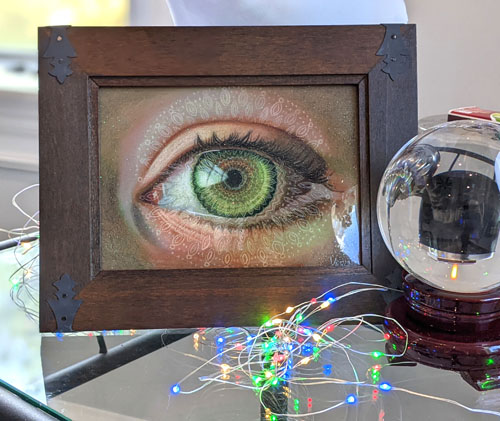
You know that I’m a realist artist, but this lockdown was long. I felt drained of creativity, motivation, and inspiration to produce anything. As a result, I began to experiment with other media in my studio, hoping to revive my feeling of joy. For some reason, it was difficult to find excitement in my ‘regular’ portrait painting and colored pencil drawing. So the idea was to learn resin art and fluid art painting techniques from scratch to combine them with my realist art in a new way. Here I’d like to share what I learned doing resin art (and the resin art supplies list at the end of this article).

1. Resin quality & variety
All resins are different in consistency and application. You have to try several different brands to figure out what works for you and your projects. For example, Liquid Diamonds is a high-quality resin that runs like water. It’s both good and bad for resin artists. It’s good because you need much less resin to cover the surface. It also generates less heat as a result of thin application. (Not melting the wax in colored pencil as much due to less heat produced). It’s not great because it can run over the edge really badly. The entire batch of mixed resin can potentially run off the surface through one small cavity present between the edge and the tape. I think that Liquid Diamonds art resin is great to use on the surfaces that already have borders, like a tray or a bowl.
Some resins have doming capabilities, like Little Windows or KSRESIN. This is great to hold the edge and not so good cost-wise because you need to apply a lot more resin to cover the surface completely, especially if you work in subsequent layers. Thicker resins tend to roll off the previous resin layer unless you have enough to cover the entire surface or you’ve done some sanding. And that’s why it depends on what kind of resin art project you do.
Each resin works great for specific projects and may be terrible for others. I’ve done small jewelry pieces, small and large resin paintings, as well as some geode art and large geode pieces. In my experience, Little Windows mixes great and gives very few (if any) bubbles, working small (jewelry and small craft projects). It’s crystal clear, easy to mix and dome, and non-toxic! I didn’t like it that much working with large however, because it likes to be poured all at once and left untouched. Otherwise, it could leave strange patterns in the resin. Other resins like KSRESIN or Liquid Diamonds give me a chance to spread the resin around the panel and to manipulate it somewhat to cover the surface without leaving any patterns in it.
2. Consider the scale of your project
As a result, the scale of your project or the amount of mixed resin you need requires experience that no one can give you in a tutorial. Only by mixing the resins yourself and applying them in your varied projects, you learn what works and what doesn’t, and how much mixed resin you need for a specific art piece.
One advice I can give you is to start small. Resin is expensive to waste it especially if you buy art resins. But most importantly, working small cuts on your frustrations because a lot of things can go wrong working big (mixing not enough resin, falling dust, broken edge, uneven application, bubbles, etc). By working small, you minimize your frustration with so many potentially frustrating problems!

3. Consider working time
Working time varies greatly in resins. Quick Coat Resin can start setting up in 10-15 minutes, while KSRESIN has 45+minutes working time. If you don’t add any powders or paint to the mixture, the working time is long enough to spread it around, torch it, level it out, and torch again.
In my experience, what I found cuts on working time greatly are high humidity levels, high room temperature, and the amount of added pigments mixed into the resins. This becomes crucial to learn when you do large resin art pieces! Because resins can set up almost instantly, having acrylic paint or mica powder mixed into them. They’ll set up so quickly you won’t be able to take them out of your cup! In general, it’s best to add just a little bit of pigment to resin for it to set up properly.
Also, if you make geode art, you want some of your edges to blend more while others look hard. Working time and layering greatly affect what kind of edge you’ll get between the colors.
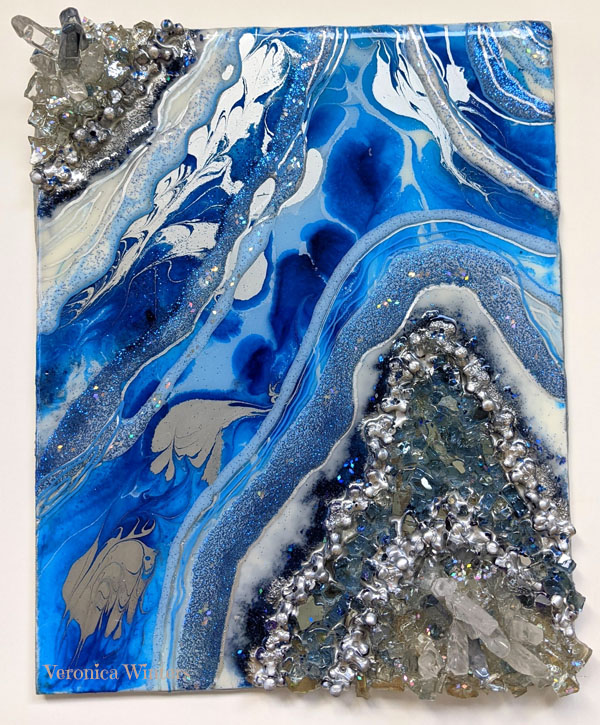
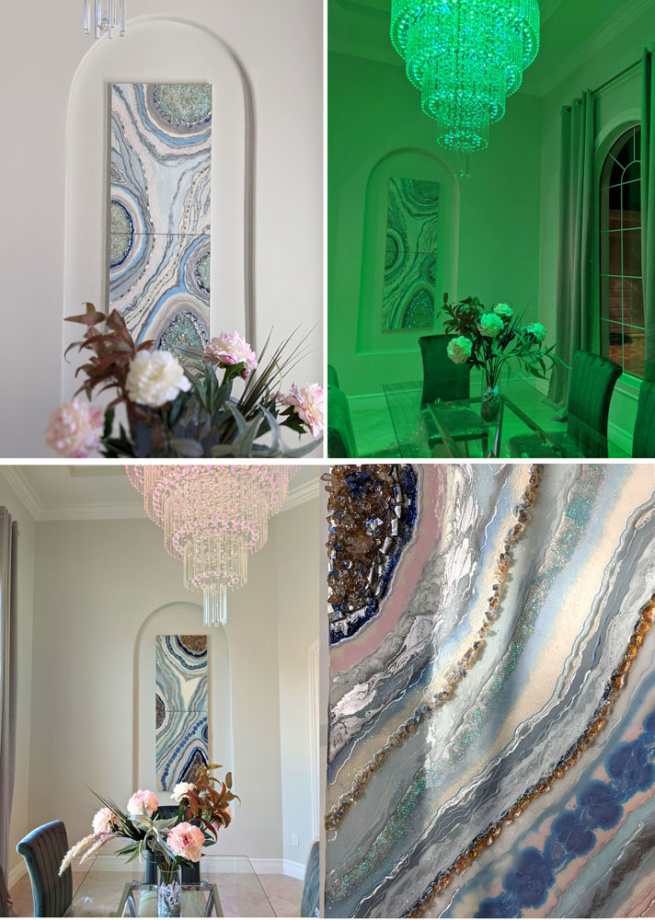
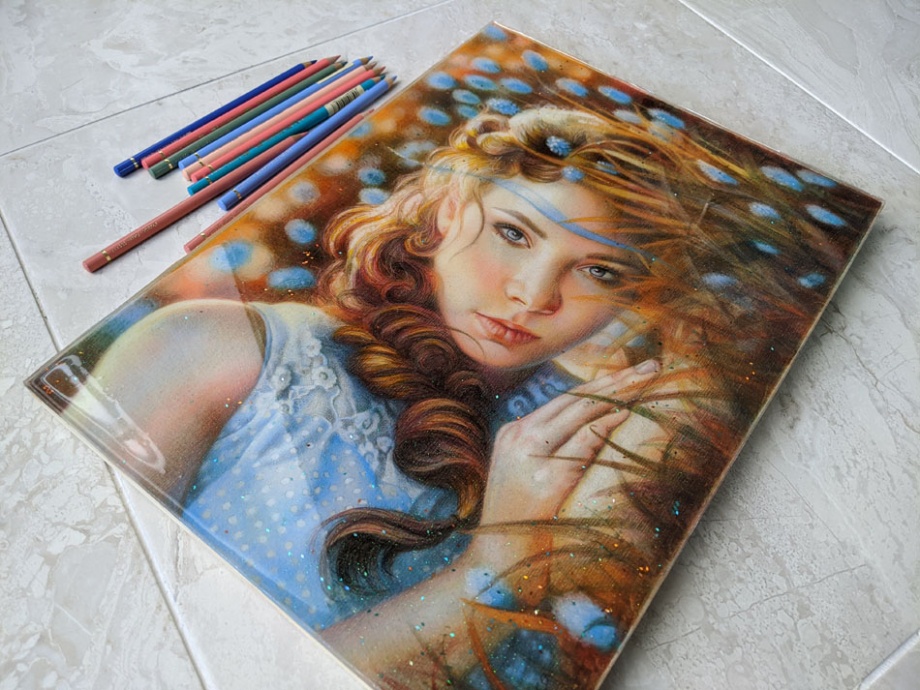
I poured Little Windows resin over the varnished drawing. Glitter sparkles and gives it a magical feeling. This resin art is available for sale.
Mixing Ratio
Resins have varied mixing instructions in terms of volume and time needed to mix both parts. You must follow the mixing ratios written in the instructions for every new resin you use. Some resins have 2:1 mixing ratios, and others have 1:1 ratios. Mixing time varies too and it’s very important not to cut on mixing time. Spend as much time as necessary mixing the two parts into one, and only after that add pigments/glitter/ powder into it and mix it some more. For example it takes 4 minutes to mix both parts of KSRESIN. Why is it important? You need to do it right to prevent having soft spots, cracking or uneven application.
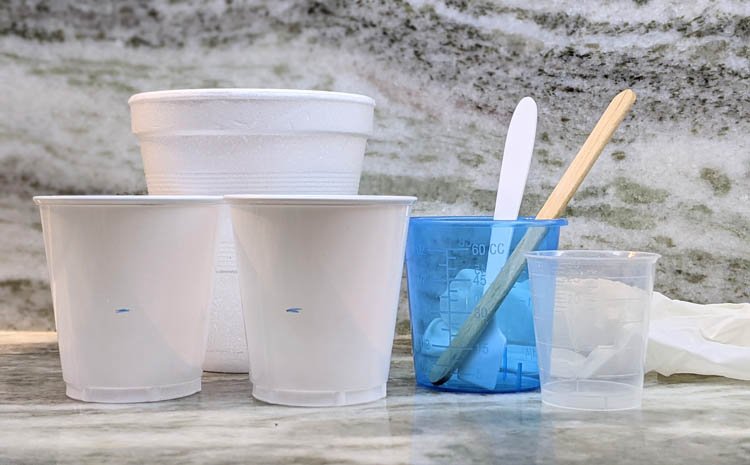
If you use plastic cups that don’t have precise measurements written on them, pick identical cups and measure the level you want with a ruler. For example, I can measure and mark 1 inch from the cup’s bottom. I mark both cups with a sharpie, pour equal parts of hardener and resin into those cups leveling resin out to that 1″ mark and then I take the 3d cup to combine these two together. If it’s 2:1 ratio, you can’t measure 2 inches vs 1 inch because the cup widens. So I use the same 1″ cup to measure it twice.

4. Bubbles
Bubbles. Yes, those pesky bubbles happen naturally because you mix part A with part B, and the air gets trapped in the chemical process of mixing the two parts. Resins are very different in the number of bubbles they produce. Little Windows resin has very few bubbles that tend to disappear on their own, especially when you let it rest first and then blow some air by your mouth over the art. I never torched this resin, and it came out perfectly even and crystal clear. Liquid Diamonds is not super bubbly either.
You must get a small, culinary torch to work with most (if not all) resins because bubbles stay in cured resin for good and screw up the overall appearance of the finished piece. Some resins are very bubbly, and there is no way around it but using the butane torch.
Picking and working with the culinary torch is tricky. I think that the construction of any handheld torch is about the same, despite their difference in price. Based on the reviews I’ve read, all of them have similar flaws, not working properly from time to time… ( Just read one-star reviews on Amazon to understand common problems associated with it). The amount of flame changes without changing the knob, or it doesn’t want to charge butane one day and does charge it just fine the next day.
Buy it. Work with it, but be extra careful. The torch can burn the masking tape or other parts of the art where there is no resin. Potentially, it could burn anything around it or the cured resin in the previous layer…That’s why I always use the lowest setting possible, and I hold it far enough from the surface not to burn it. Also, I move my hand around the piece evenly without concentrating on any one area. When the resin is bubbly, you can see how the bubbles disappear instantly, torching them. Usually, I repeat the process twice.
I have IDEACone Premium Butane/ Culinary, refillable torch. I don’t think it’s better or worse than others. It’s just the one I got. Also, I buy Bernzomatic butane can at a local hardware store that has the most competitive price on it. Working with these small culinary torches can be tricky because the flame might be uneven, or they stop working for no reason, or they don’t charge butane as they should. In other words, small torches are very unreliable, and when you have so little time to get rid of the bubbles, you want it to work!
5. Tape
Watch what tape you use to hold the canvas or panel edge. I find that cheap or generic masking tapes don’t work the same way as Scotch masking tape does. Generic ones can stick to the surface for good. It’s very difficult to remove it when the resin cures. You must apply heat (torch it) to take it off, and when resin runs over and sticks to it, it often doesn’t come off 100 percent. Also, cheap masking tape doesn’t hold the edge well and may let the resin flow over the edge/under the tape. I had this happen too many times! Scotch masking tape stays in place. It removes easily and rarely needs a torch.
6. Dust, hair & cover
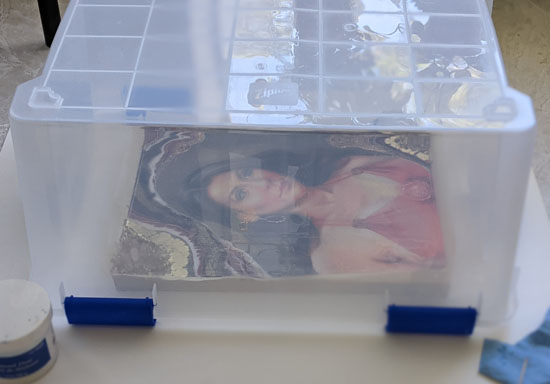
Whenever you work with resins, your space must be super clean and dust-free. Every tiny particle can land on the surface of the cured resin to destroy the beauty of the shiny surface. You can’t undo it, and it ruins the glass-like appearance of the piece if something sits on its surface permanently. It looks terrible when the dust settles right in the center of your artwork. To get rid of dust falling over your resin art, you need to find a cover for the art piece beforehand. So you can put it over the piece while it cures.
And this is when the scale of your artwork can kill you. Because the larger the piece, the more difficult it is to apply resin perfectly. This includes mixing enough resin to cover the surface, to keep it dust-free, to mix just the right amount of resin to do colors, to pop the bubbles, to keep the edges clean, etc. Your clean cover must be large enough to protect the resin piece. I use plastic box covers, tin cans, and even Ziplock 15×20 weather shield boxes.
7. Yellowing
All resins yellow over time. Some have UV light inhibitors to slow the yellowing process down. I’ve seen my resin projects yellow even when they were not exposed to the light at all. And I bought art resins, stating that they don’t yellow. They do, but for different reasons. The hardener yellows in a bottle exposed to the air within a year. So it yellows with oxidation. If the epoxy resin has UV light inhibitors, it might yellow when cured due to extreme sun exposure.
Yellowing could be a problem if you design your art piece that’s supposed to be pure white or has a cool color scheme and eventually becomes yellowish. But I find that when the surface is colored, slightly yellowed resin doesn’t really change anything visually (because this color change is almost unnoticeable on brightly colored surfaces. It also warms up the surface, which is good for the most part. Cheap resins yellow very quickly and don’t level out easily. KSRESIN Liquid Art Ultra UV Epoxy has UV-light inhibitors in it that yellow much more slowly with time, but they also yellow.
What is a UV Stabilizer in epoxy resin?
A UV stabilizer in epoxy resin is a chemical additive that helps to protect the epoxy from the damaging effects of UV radiation. UV stabilizers work by absorbing and dissipating the UV light before it can penetrate the surface of the epoxy and cause degradation.
UV radiation can cause epoxy resin to yellow, crack, or become brittle over time. This is because the UV light causes the epoxy to break down and oxidize, which can lead to a loss of strength and integrity in the material. UV stabilizers help to prevent this by blocking the UV light and preserving the quality and appearance of the epoxy.
UV stabilizers are especially important for epoxy projects that will be exposed to direct sunlight or other sources of UV radiation, such as outdoor sculptures or furniture. They can also be used in indoor projects to provide an extra layer of protection against UV radiation and to extend the lifespan of the epoxy.
UV stabilizers are often included in commercial epoxy formulations, but they can also be purchased separately as a stand-alone additive. When using a UV stabilizer, it is important to follow the manufacturer’s instructions carefully and to use the recommended amount for the particular epoxy formulation being used.
ArtResin formula includes both UV and HALS stabilization. Any resin product that does not include both HALS and UV stabilization will yellow within a year. Don’t buy cheap, low-quality resins! If you use it over your artwork, it will deteriorate the work.
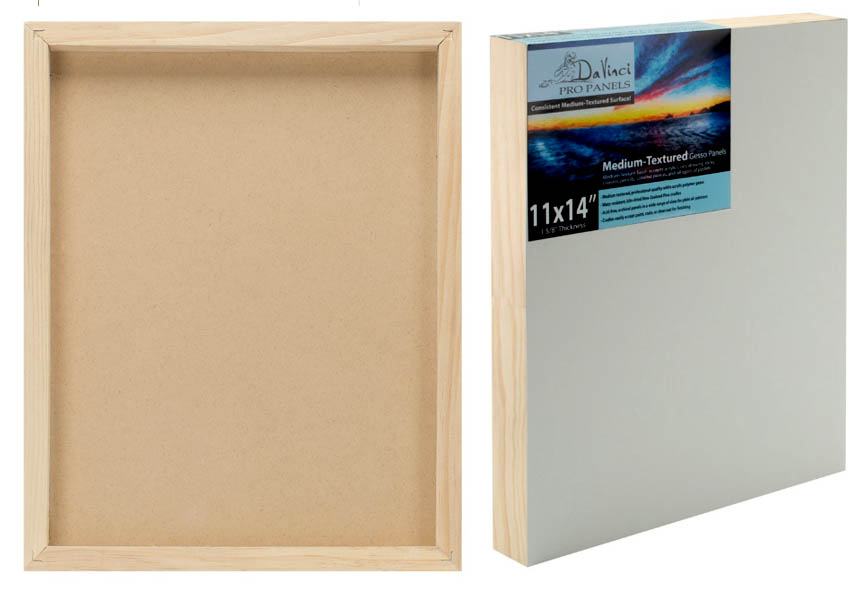
8. Surfaces & molds
Work on sturdy surfaces like wood or canvas panels, or metal panels. Regular canvases bend, cave in, and twist. Thus, they’re not great for resin application in general, although I did do some resin art on canvas.
How to resin art on canvas?
Creating resin art on canvas is a popular and beautiful way to add dimension and depth to a painting. Here are the basic steps to creating resin art on canvas:
- Prepare the canvas: Start by preparing the canvas by applying a coat of gesso primer. This will help to create a smooth surface for the resin to adhere to.
- Create the painting: Paint the canvas with acrylic paints or other media to create the desired design or image. Allow the paint to dry completely before moving on to the next step. Plan what color of the canvas you need because it will show through the resin. Even if you color resin, the base hue affects the overall design. Also, when you put crystals or glass over the colored surface, it will show as well because you pour transparent resin over the glass in order for it to adhere to the surface permanently.
- Mix the resin: Mix the resin and hardener according to the manufacturer’s instructions. Be sure to mix the resin thoroughly but gently to avoid creating bubbles.
- Apply the resin: Pour the mixed resin onto the canvas, using a spreader or brush to spread it evenly over the surface. Be careful not to pour too much resin in one area, as this can cause the resin to run off the canvas. I usually tape the borders with high-quality masking tape.
- Add color or texture: If desired, add color or texture to the resin using pigments, glitters, or other materials. Use a brush or tool to create swirls or other patterns in the resin.
- Allow to cure: Allow the resin to cure for at least 24 hours, or as recommended by the manufacturer. Keep the canvas in a dust-free, well-ventilated area during the curing process.
- Sand and polish: Once the resin is fully cured, sand any rough spots or edges. Polishing isn’t required on the surface itself because it cures with a smooth, glossy finish that does look like glass.
Creating resin art on canvas can be a fun and rewarding project, but it is important to follow the manufacturer’s instructions carefully and to take proper safety precautions when working with epoxy resin. Wear protective gear and work in a well-ventilated area to avoid inhalation of fumes.
Molds are not made the same! Cheap ones give resin a matte look, and you have to either polish your resin piece or throw it out. Silicone molds designed specifically for art projects keep resin pieces very shiny when you take them out of the mold and you don’t need to do anything extra to make them crystal clear and shiny. So whenever you shop for molds, read reviews first. I often go to Facebook groups to see discussions or to ask a question about resin. I love my jewelry molds from Little Windows store (links are below).
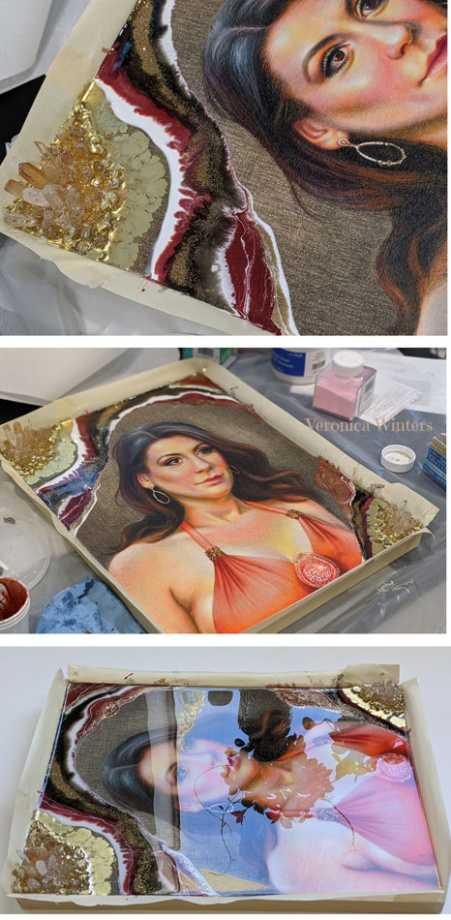
9. Varnish
Because I’m a follower of classical painting, I don’t come from making craft projects, although there are so many creative resin art ideas I want to explore!!! I wanted to make my drawings look more like paintings under glass with a touch of magic in them. So this is why I began doing resin art. If you decide to try to do something similar, you must protect your drawing with a varnish first. If you don’t, it will change the color and tones of your art! The drawing may disappear. When you apply mixed resin, it generates heat and melts some wax in the colored pencil. You must prevent it from having a complete meltdown. I apply several coats of synthetic spray varnish over my drawings outdoors before covering them with resin. My favorite is Grumbacher matte final fixative for pastel, charcoal & pencil (drawing). There is no need to varnish pieces made of resin from scratch. I think it’s useful to varnish acrylic pieces before applying resin over the acrylic painting, so there is no interaction between the art and the resin.
Do I need to seal my art before resin application?
Sealing your artwork before applying resin may not be appropriate for all types of artwork. It depends on the project. While sealant isn’t required, there are some situations where it may be beneficial to seal your artwork before applying resin. For example, if your artwork is made with porous or absorbent materials, such as unprimed canvas or raw wood, it may be helpful to seal the surface to prevent the resin from soaking into the material and to ensure an even finish.
If you do decide to seal your artwork before applying resin, it is important to use the correct type of sealer for your particular medium. For example, if you are working with a painting on canvas, you may want to use a clear acrylic sealer or mudpodge (puzzle sealant) to seal the canvas or paper before applying the resin. When applying the sealer, be sure to follow the manufacturer’s instructions carefully and to allow the sealer to dry completely before applying the resin. Brushing the sealant ensures the coverage but dries slowly, unlike using a spray fixative, for example. Also, most papers require a sealant because they’re absorbent, although high-quality, glossy papers may do just fine. Brush the sealant on both sides of the paper!! If you use a spray sealant, use several coats on your artwork, spraying it in a well-ventilated area that’s clear of dust, too. Let each spray coat dry completely for at least half an hour.
Use Kamar Varnish to seal your alcohol ink art on Yupo paper, which is a super glossy art paper that has different properties from regular paper. I always test every surface I want to seal before going big. Trust me, it’s worth the extra effort!
I’ve never done resin on wood, but I bet it must be sealed as well because I find that almost any surface is absorbent enough for a resin to change its final appearance. Also, dry flowers must be sealed as well before dropping them into the resin. Sealant helps with the bubbles issue as well.
One more thing, don’t use resin over traditional oil paint!
10. What if?
What if something goes wrong during pouring or resin setup? You could have an uneven surface or lots of dust set up on the piece. Or the resin didn’t mix properly and produced soft spots or cracks. Wait for it to cure 100%. Then carefully wet sand the surface with 600-800-grit sandpaper. Sanding will make the image look cloudy, but it will also give the new layer a better grip to add a new layer of resin. I used 800 grit sandpaper to even out the surface twice on one piece. When you sand it, the resin becomes cloudy, and it’s nerve-rackin,g but it becomes glossy once you pour a top layer of resin over it.
I recommend Imperial Wetordry sandpaper by 3M. I regret I didn’t buy this tool sooner to sand my canvases. The sander is fantastic to even out the surface in seconds! I used Black & Decker 1/4 sheet sander that I bought at a local hardware store like Home Depot or Lowe’s.
You’re ready to repour after sanding. Make sure your piece is leveled before re-pouring. I usually pour working on my table first, but when the resin begins to settle, I take the panel to the floor to cure overnight. High-quality resins level out well. The floor has a perfect, even surface for the resin to level out on my panel evenly.
In conclusion, doing resin art is fun, but it can also be a very frustrating and expensive process to figure everything out on your own. Please start working small. Use high-quality resins. Learn how to mix and apply colored resins as well as how to use the torch. And happy painting!
Video
Resin art for sale
All resin art pieces are for sale. Email me if you’re interested to buy something you see here. Or look at colored pencil gallery images to see available pieces, sizes, and pricing.
Most common questions about epoxy resin art:
How to prevent bubbles in epoxy resin?
Preventing bubbles in epoxy resin can be a challenging task, but there are several methods that can be used to minimize or eliminate them. I find that the bubbles is a natural occurrence in epoxy resin mixing because it’s a chemical reaction mixing the two parts, but some resins bubble more or less, depending on the brand. The one by Little Windows almost has no bubbles, but the resin itself isn’t suitable for big projects in my experience.
- Mix the resin and hardener thoroughly but gently. When mixing epoxy resin and hardener, it is important to stir the mixture slowly and carefully to avoid creating air bubbles. Use a stirring stick or spatula and avoid using a mixer or shaking the container, as this can create even more bubbles.
- Warm the resin before mixing: Epoxy resin can be sensitive to temperature changes, so it is recommended to warm the resin slightly before mixing it with the hardener. This can help to reduce the viscosity of the resin and make it easier to mix without creating bubbles. Warm resin flows better in my opinion, and I place it in a warm water bath for 15 minutes prior to mixing. Be careful not to transfer water into the epoxy resin mix!! Wipe the bottles off with a paper towel completely.
- Use a torch or heat gun: After pouring the epoxy resin into the mold or surface, use a torch or heat gun to gently heat the surface of the resin. This can help to pop any bubbles that have formed and release them from the resin. I find this to be the most effective method for dealing with the bubbles.
- Allow the mixture to settle: After mixing the epoxy resin and hardener, let the mixture sit for a few minutes to allow any bubbles to rise to the surface. Use a toothpick or a small spatula to pop the bubbles before pouring the mixture into the mold or surface. The bubbles do seem to minimize in scope, letting the epoxy resin settle, but don’t wait for too long because it starts curing.
- Apply in thin layers: When applying epoxy resin in layers, apply each layer as thinly as possible. This can help to prevent bubbles from forming and ensure that the layers bond together properly.
- Use a degassing chamber: If you are working with large amounts of epoxy resin, using a degassing chamber can help to remove bubbles before pouring the resin. A degassing chamber uses vacuum pressure to remove air from the resin, resulting in a bubble-free mixture.
By following these tips, you can reduce or eliminate bubbles in your epoxy resin projects and achieve a smooth and even finish.
Is resin art harmful?
Resin art can potentially be harmful if proper precautions are not taken. Epoxy resin is a chemical product that can release fumes during the curing process, and it can also cause skin irritation or allergic reactions if it comes into contact with the skin. It depends on what brand of epoxy resin you work with. For example, epoxy resin by Little Windows and ArtResin is safe because it has no solvent ingredients, no BPA, no harmful fumes or VOCs released. They’re food safe and are non-flammable and non-hazardous. Maybe there are more resins of this kind but you must check the manufacturer’s site for the safety issues or safely certifications when you plan to by the product.
If you resin isn’t safe or you’re not sure of its properties, then follow these guidelines:
- Work in a well-ventilated area: When working with epoxy resin, it is important to work in a well-ventilated area to avoid inhaling fumes. Open windows and doors or use a fan to ensure good air circulation.
- Wear protective gear: Wear gloves, a respirator mask, and protective clothing to prevent skin contact and inhalation of fumes.
- Read the product label: Read the product label carefully and follow the manufacturer’s instructions for mixing and applying the resin. Use the product as directed and do not deviate from the instructions.
- Use a clean workspace: Keep your workspace clean and free of debris to avoid contaminating the resin with dust or other particles.
- Dispose of waste properly: Dispose of any leftover or unused resin and hardener properly according to the manufacturer’s instructions.
By following these safety precautions, you can minimize the risk of harm when working with epoxy resin. If you experience any symptoms of skin irritation or respiratory distress while working with resin, stop working immediately and seek medical attention.
Can I use my epoxy resin hardener that turned yellow?
It’s tricky. I did use the yellowed hardener that had set in my box for about a year. The art resin pieces turned out just fine. However, If your epoxy resin hardener has turned yellow, it is likely that it has expired or has been exposed to the air with heat, moisture, or direct sunlight. It oxidizes with air. The resins usually do have a 6-month to 1-year shelf life. It is not recommended to use a hardener that has turned yellow, as it may affect the curing process and the final result of your resin project. Expired or compromised hardener can cause the resin to take longer to cure, or it may not cure at all. This can result in a sticky or tacky surface that is difficult to work with, or a surface that remains soft or flexible.
If your hardener has turned yellow but it’s been used within a year, try using it on smaller projects with color like alcohol inks or acrylics or glitter. Mix it the same way as in the instructions. Don’t change the mixable amounts. Also, while it looks very yellow in a bottle, when you mix it with the second part, it’s diluted.
Why doesn’t resin cure?
There are several reasons why resin may not cure properly. Here are some of the most common causes of resin not curing:
- Incorrect mixing ratio: If the resin and hardener are not mixed in the correct ratio, the resin may not cure properly. Be sure to follow the manufacturer’s instructions carefully and use the recommended mixing ratio.
- Incomplete mixing: If the resin and hardener are not mixed thoroughly, the resin may not cure properly. Be sure to mix the resin and hardener together thoroughly, scraping the sides and bottom of the mixing container to ensure even mixing.
- Improper temperature or humidity: Epoxy resin requires specific temperature and humidity conditions to cure properly. If the temperature is too cold or too hot, or if the humidity is too high or too low, the resin may not cure properly. I find that humidity and room temperature greatly affect the curing time of the resin, and it will vary in your case, despite all the advice or instructions.
- Old or expired resin: Epoxy resin has a limited shelf life and can expire over time. Using old or expired resin can cause the resin to cure improperly or not at all.
- Contamination: Contamination can occur when foreign materials such as dust, dirt, water or oils are introduced to the resin. This can prevent the resin from curing properly.
- Improper surface preparation: If the surface is not properly prepared before applying the resin, it may not adhere properly and may not cure properly.
If your resin does not cure properly, it is important to identify the cause and take steps to prevent it from happening in the future. Be sure to follow the manufacturer’s instructions carefully, and store and handle the resin properly to ensure optimal performance within a year of purchase.
Does resin art break easily?
The durability of resin art depends on a variety of factors, such as the thickness of the resin layer, the type of resin used, and the application technique. In general, cured epoxy resin is a strong and durable material that is resistant to cracking, chipping, and peeling. In my experience, it’s as hard as a rock and doesn’t break easily. It was scratched with a wire one time, however. Also, there are some factors that can cause resin art to break or become damaged over time.
One of the main factors that can affect the durability of resin art is the thickness of the resin layer. A thick layer of resin can be more prone to cracking or breaking than a thinner layer. It is recommended to apply resin in thin layers, allowing each layer to cure completely before applying the next. Depending on the manufacturer, you’ll the the full cure of resin at different times, varying anywhere from 24 hours to 3 days. So if you apply resin in layers, wait for the complete cure of the art resin to be on the safe side of things.
The type of resin used can also affect the durability of resin art. Some types of resin are formulated to be more durable and impact-resistant than others. It is important to choose a high-quality epoxy resin that is designed for use in art and craft projects.
Another factor that can affect the durability of resin art is the application technique. If the resin is not applied evenly or is not allowed to cure properly, it can become brittle or prone to cracking over time. It is important to follow the manufacturer’s instructions carefully and to take proper safety precautions when working with epoxy resin.
Overall, with proper application and curing, epoxy resin art is a very durable and long-lasting medium that is resistant to damage.
What resin art sells the best?
The popularity of resin art is constantly evolving, and what sells the best can vary depending on factors such as current trends, consumer preferences, the target market, and your unique art style!!! That being said, there are a few types of resin art that tend to be consistently popular among buyers.
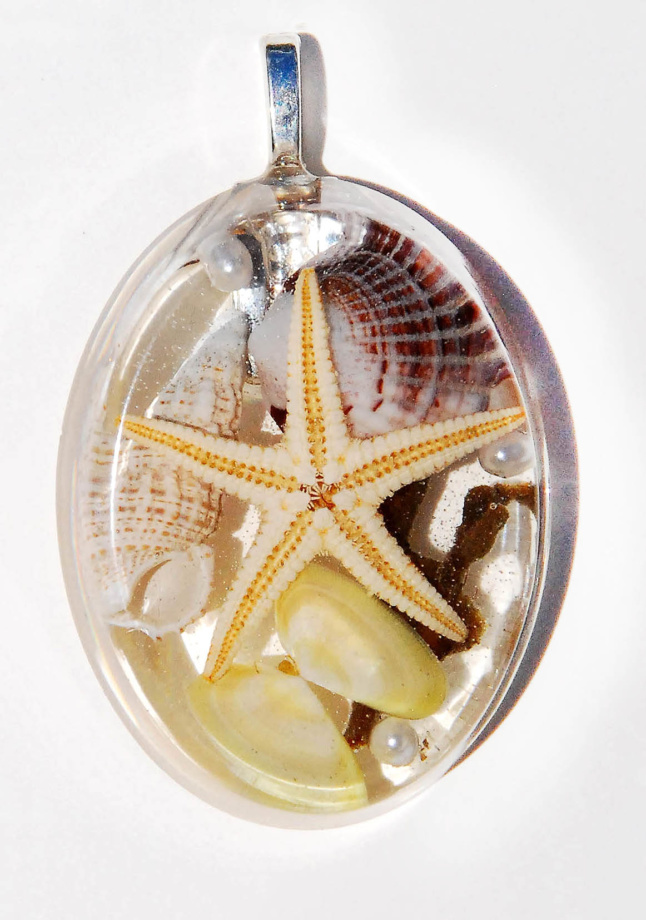
Geode resin art: Geode resin art involves creating the look of natural geodes by pouring colored resin into a prepared surface and adding metallic accents, crystals, glass, glitte,r and so on. This type of resin art has become very popular in recent years due to its sparkly, eye-catching look.
Ocean-inspired resin art: Resin art that is inspired by the ocean, such as beach scenes, ocean waves, or sea creatures, is also very popular. The translucent nature of resin makes it well-suited for creating a realistic water effect.
Resin jewelry: Resin jewelry, such as necklaces, earrings, and bracelets, is a popular type of resin art. Resin can be mixed with pigments or glitter to create unique and colorful pieces of jewelry.
Resin coasters and trays: Resin art can be used to create functional items such as coasters and trays. Resin coasters and trays can be customized with various colors and textures, making them a popular choice among buyers.
Abstract resin art: Abstract resin art is also popular, as it allows for a wide range of styles and interpretations. Abstract resin art can be created using a variety of techniques, such as mixing and layering different colors of resin.
I recommend working large because people love to get big pieces to fill the wall space. At the same time, working small can also work well because more people can afford it, so it could be a quick purchase that doesn’t break the bank. Such resin art pieces include coasters, small art, keychains, jewelry, etc. In other words, it depends on what art market you want to target and where you plan to sell your resin art.
Keep in mind that the best type of resin art to sell will depend on your own interests, skills, and preferences. It is always a good idea to research current trends and to experiment with different styles and techniques to find your art style. Otherwise, all resin art pieces look very similar to the buyer, so you must come out as a different brand with your unique style. Also, I find that sales strongly correlate with an artist’s personality and willingness to sell art. Extraverted, outgoing people sell art naturally, while for introverts it’s a job that may affect the sales.
Can resin art be done on glass?
Yes, resin art can be done on glass, and it can create beautiful and unique effects. Glass can be used as a surface for resin art, and the translucent nature of the glass can add depth and dimension to the finished piece. Personally, I applied resin over plexiglass that looks like glass but can’t break like glass. When working with resin on glass, it is important to prepare the surface properly. Here are some tips for working with resin on glass:
Clean the glass: Thoroughly clean the glass surface to remove any dirt, dust, or oils. Use a glass cleaner or rubbing alcohol to ensure the surface is clean and free of any contaminants.
Prepare the surface: If the glass is smooth, you may need to create a rough surface for the resin to adhere to. This can be done by lightly sanding the surface with fine-grit sandpaper or using a glass etching cream.
Apply a base coat: Apply a base coat of resin to the glass, using a spreader or brush to spread it evenly over the surface. This will help the subsequent layers of resin adhere to the glass.
Apply the resin: Pour the mixed resin onto the glass surface, using a spreader or brush to spread it evenly over the surface. Be sure to work carefully to avoid creating air bubbles.
Add color or texture: If desired, add color or texture to the resin using pigments, glitters, or other materials. Use a brush or tool to create swirls or other patterns in the resin.
Allow to cure: Allow the resin to cure for at least 24 hours, or as recommended by the manufacturer. Keep the glass in a dust-free, well-ventilated area during the curing process. I usually cover my projects completely to prevent the dust from settling on a surface. It’s very disappointing to work on resin art so hard only to see a tiny hair permanently sticking to the surface. Also, make sure your surface is absolutely flat and you work on a flat table, because the resin will self-level and accumulate in an area if you place glass at a very slight angle.
Working with resin on glass can be a challenging but rewarding process. It is important to take proper safety precautions when working with epoxy resin and to follow the manufacturer’s instructions carefully to ensure the best results.
Where to buy resin art supplies:
Shops:
Little Windows resins, quality resin molds & resin art supplies If you shop on this site I have a 15% off coupon for you. Enter beautifulart coupon code at checkout. I like their molds. Resin art pieces come out brilliant clear.
The Epoxy Resin Store where you can buy a variety of artist-grade resins that include Liquid diamonds, KSRESIN, the artist’s choice, Liquid Art Ultra UV Epoxy and many more!
Artresin.com
Pinata color rich gold/silver alcohol inks make fantastic, rich gold and silver colors!
Imperial Wetordry sandpaper by 3M
Black & Decker 1/4 sheet sander
Scotch masking tape
Gorilla glue gun and glue sticks
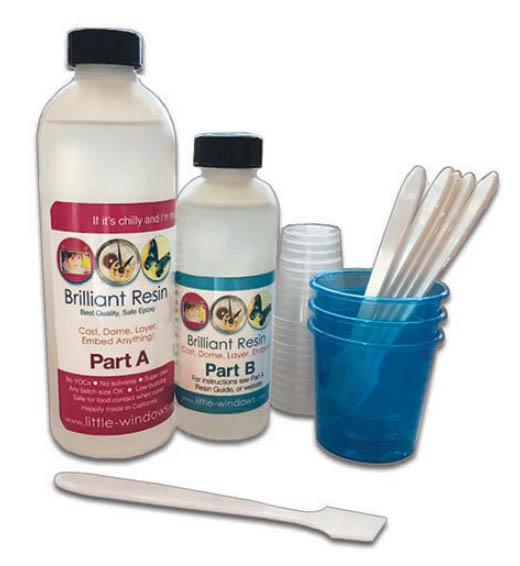
Mixing cups and sticks
Disposable gloves (buy the ones that sit tight on your hands! It’s a messy process).
Grumbacher matte final fixative for pastel, charcoal & pencil
Wood panels:
You must have a gessoed surface (white ground that you see on panels) to do resin art and acrylic paintings. So you either buy white wood panels or you apply gesso over the wood panels.
I’m an amazon affiliate.
Online Art Classes
Tired of making the same mistakes? Take an art class in your pajamas! https://veronicasart.com/shop/